Logo - Full (Color)

How to BCC in Outlook

Learn how to do BCC in Outlook to protect recipient privacy while sending efficient mass emails. Then, use HubSpot's free Outlook signature generator to further enhance the professionalism of your emails.
A woman sitting down in front of her desk learning how to bcc in Outlook

Adding BCC to Outlook Email in 2025

The blind carbon copy (BCC) feature in Microsoft Outlook enables you to send emails to multiple recipients while keeping their email addresses completely private from each other. This essential privacy tool has become increasingly critical as the majority of consumers prefer receiving brand updates via email over other channels, making secure mass email functionality vital for professional communications.

Unlike standard CC (carbon copy), BCC recipients cannot see other recipients' email addresses. Therefore, when you add BCC to Outlook, you prevent accidental data exposure and maintain compliance with privacy regulations. Turn on BCC in Outlook to also eliminate the "Reply All" functionality, protecting your email list from unwanted mass responses that could overwhelm inboxes and compromise privacy. 

How to Blind Copy in Outlook

Understand how to add BCC in Outlook through the following easy steps: 

1. Open New Email: Click "New Email" button in the Home ribbon or press Ctrl+N

To learn what bcc in Outlook is, first create a new email.

2. Activate BCC Field: Click the "Options" tab, then select the "Show BCC" option in the Show Fields group.

Next, click on Bcc located to the right of the To line.

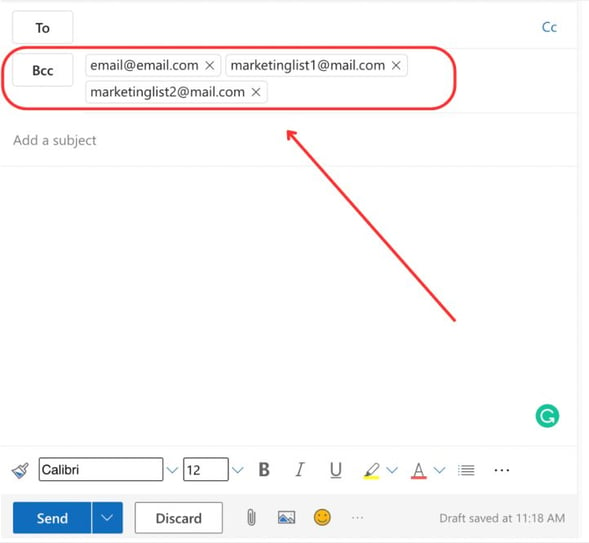
3. Enter Recipients: Type recipient email addresses in the BCC field, separated by semicolons.

Make sure to add recipients to the Bcc line, not the To line.

4. Compose Message: Write your subject line and email content. When you’re done, click "Send" – your recipients will receive individual copies without seeing others. 


Why Use BCC Instead of CC? 

The key difference between CC and BCC in Outlook is that when using CC, secondary recipients are visible to all, whereas BCC allows the recipient list to be hidden. Use BCC instead of CC to protect recipient privacy, prevent "Reply All" chaos, comply with data protection regulations, and maintain professional communication standards. 

BCC is essential when recipients don't know each other, shouldn't have access to the full distribution list, or when sending to large groups where "Reply All" could create email overload. CC should only be used when transparency is desired and all recipients need to see who else is included in the conversation. 

When to Use BCC vs. CC:

Use BCC Use CC
Customer newsletters

Mass announcements

Privacy-sensitive communications

Team collaboration

Transparent group discussions

How to Change CC to BCC in Outlook

Converting CC recipients to BCC protects privacy when you realize mid-composition that recipients shouldn't see each other's addresses. This common scenario occurs when forwarding emails, responding to group messages, or correcting privacy oversights before sending. Use the following methods to change CC to BCC in Outlook. 

Method 1: Drag and Drop (Desktop Outlook)

1. Ensure BCC is Visible: Click Options > Show BCC if not already displayed
2. Select Recipients: Click and hold on email addresses in CC field
3. Drag to BCC: Move selected addresses to BCC field
4. Verify Transfer: Confirm all addresses moved correctly

Method 2: Cut and Paste Approach

1. Select All CC Recipients: Triple-click CC field or use Ctrl+A after clicking in CC
2. Cut Recipients: Press Ctrl+X or right-click and select "Cut"
3. Navigate to BCC: Click in the empty BCC field
4. Paste Recipients: Press Ctrl+V to paste all addresses
5. Clean Formatting: Ensure proper semicolon separation


Converting Existing Email Chains

When Replying to Group Emails:
1. Click "Reply All": Start with all recipients visible
2. Show BCC Field: Enable if hidden
3. Move All Recipients: Transfer everyone except original sender to BCC
4. Add Context: Include note: "Moving everyone to BCC for privacy"


Best Practices for CC to BCC Conversion:

  • Timing: Always convert before sending - cannot modify after sent
  • Verification: Double-check no addresses remain in CC if privacy intended
  • Communication: Inform recipients when converting ongoing threads to BCC
  • Documentation: Save original CC list separately if needed for records

How to Add Multiple BCC in Outlook

Managing multiple BCC recipients efficiently requires understanding Outlook's capacity limits and best practices for how to use BCC on Outlook. Outlook supports various methods for adding numerous recipients while maintaining professional standards and deliverability.

Method 1: Manual Entry

1. Type addresses separated by semicolons: email1@domain.com; email2@domain.com
2. Copy-paste from spreadsheets maintaining semicolon separation. Maintain a maximum 500 recipients per message in Outlook 365

Method 2: Contact Groups (Distribution Lists)

1. Create Group: Navigate to People > New Contact Group
2. Add Members: Select from contacts or add new addresses
3. Name Group: Use descriptive names like "Q4_Newsletter_List"
4. Use in BCC: Type group name in BCC field

Method 3: Import from External Sources

From Excel: Format column with semicolons, copy entire cell to BCC
From CRM: Export contact lists in Outlook-compatible format
From Previous Emails: Copy BCC field from sent items

Frequently Asked Questions

BCC stands for "Blind Carbon Copy" and allows you to send emails to multiple recipients without revealing their email addresses to each other. When you use BCC, each recipient sees only their own email address and the sender's address – all other BCC recipients remain completely invisible. This privacy feature protects recipient confidentiality and prevents unwanted "Reply All" situations that could compromise sensitive email lists.

BCC performs three critical functions in email communication: it hides recipient email addresses from each other, prevents "Reply All" functionality for mass emails, and maintains privacy compliance for business communications. When you BCC someone, they receive an exact copy of your email but cannot see who else received it, making it ideal for newsletters, announcements, and any situation requiring recipient privacy protection.

Blind Carbon Copy (BCC) in Outlook functions as a privacy shield for email communications, allowing senders to include multiple recipients without revealing their identities to each other. BCC on Outlook traces its origins to paper correspondence practices but has evolved into an essential digital privacy tool for modern email marketing, internal communications, and customer outreach. 

In Outlook Desktop, the BCC field appears after clicking the "Options" tab and selecting "Show BCC" in the Show Fields group. For Outlook Web Application (OWA), you'll find the BCC button directly next to the TO field when composing a new message. On Outlook Mobile apps, tap the down arrow next to the TO field to reveal the BCC option. Once you enable BCC in Outlook, the BCC field will remain visible for all future emails until manually hidden.

To blind copy in Outlook, first open a new email message, then activate the BCC field by clicking Options > Show BCC (Desktop) or clicking the BCC button (Web). Next, enter recipient email addresses in the BCC field, separating multiple addresses with semicolons. Complete your email content and subject line, then click Send. Recipients will receive individual copies without seeing other recipients' addresses, ensuring complete privacy for your email list.

BCC in Outlook works by creating individual email copies for each recipient while stripping out all other recipient information from the email headers. When Outlook's mail server processes a BCC email, it generates separate messages for each BCC recipient, containing only their address in the delivery information. This server-side process ensures that even tech-savvy recipients cannot discover other BCC addresses by examining email headers or metadata.

Outlook allows different BCC limits depending on your version: Outlook 365 and Desktop versions (2019/2021) support up to 500 recipients per BCC field, while Outlook.com (free web version) limits BCC to 100 recipients per message. However, for optimal deliverability and to avoid spam filters, it's recommended to limit BCC recipients to 50-100 per email. Larger distributions should use mail merge or dedicated email marketing platforms.

To add the BCC line in Outlook Desktop, click "New Email," then navigate to the "Options" tab and click "Show BCC" in the Show Fields group - the BCC field will appear below the CC field. In Outlook Web, simply click the "BCC" button next to the TO field when composing. For permanent visibility, go to File > Options > Mail > Send messages and check "Show BCC" to display it by default in all new messages.

Yes, you can send an email using only BCC recipients in most Outlook configurations, leaving the TO field empty for maximum privacy. However, some Exchange Server configurations require at least one TO recipient; in these cases, best practice is to put your own email address in the TO field. This approach ensures all actual recipients remain hidden while satisfying any server requirements for a primary recipient address.

BCC provides critical privacy protection that CC cannot offer: it completely hides recipient email addresses from each other, making it the only appropriate choice for customer newsletters, marketing announcements, or any communication involving recipients who haven't consented to sharing their contact information. While CC creates visible, public lists where all recipients can harvest email addresses and trigger potentially embarrassing "Reply All" storms affecting hundreds of inboxes, BCC eliminates these risks by isolating each recipient's view of the message. Learn how to BCC someone on Outlook to safeguard recipient privacy and maintain professional email standards across all your business communications.